If you’re involved in marketing operations, whether as a business owner or marketer, you’re likely aware of the importance of marketing automations. Nowadays, there are numerous channels available for distributing your messaging, such as Facebook and Instagram ads, Google search ads, emails, and texting.

As a marketer, your goal is to deliver the right message to the right audience at the right moment. This involves displaying different advertisements to individuals who are unfamiliar with your brand, those who have previously visited your website, and those who are already your customers, among others. Segmenting your audience lists and updating them in real time allows you to achieve this.
Fortunately, you don’t need to be an enterprise to implement this kind of operation. All you need is a spreadsheet, an automation tool, and some time to set it up. Let’s explore how you can develop such an automation using Google Sheets and Make automation tool.
Before we start executing the actual scenario, it’s important to understand our objectives. Our goal is to update our audience lists in real-time. For example, we may have the following audience lists:
- New/fresh leads
- Hot leads (leads with a high intent to become customers)
- Cold leads (leads that aren’t showing a high intent to become customers)
- Customers
- Irrelevant
Please note that this is just an example, and you can modify the acquisition pipeline as needed. For instance, you can add a segment for cancellations and create unique messaging for canceled users. However, for simplicity, we will use the provided examples.
In Make, you can find a wide range of integrations for auto-responders, CRMs, website platforms, and more. In our example, we will assume the role of a small business that manages its leads in a simple spreadsheet. All users are collected there, and as the marketing and sales owners, we regularly update this spreadsheet based on the status of the leads. The process will proceed as follows:
- The lead’s status is manually changed in the spreadsheet.
- A webhook is sent to Make.
- The scenario is executed to segment the user on Facebook Ads.
Now let’s dive into our no-code development.
Prepare your spreadsheet
First, let’s create a basic and simple spreadsheet to collect all our leads. We’ll use a straightforward format that includes the following fields:
- Name
- Phone
- Campaign (associated with lead generation)
- Status
- Comments
This list should be enough for our example. To make it easier to define, I have used a dropdown menu for the status field. I have also added some dummy data, and it now looks like the following:

Next, we need to ensure that Make is integrated with our spreadsheet. We will be using Google Sheets, a powerful and user-friendly tool that is completely free and can integrate with other applications. To enable Make integration and create triggers based on changes made in the spreadsheet, we need to add the Make extension. To add it, follow these steps:
- Click on “Extensions” in the menu.
- Select “Add-ons”.
- Choose “Get add-ons”.

Then, search for “Make for Google Sheets”. Make sure to select the one below.

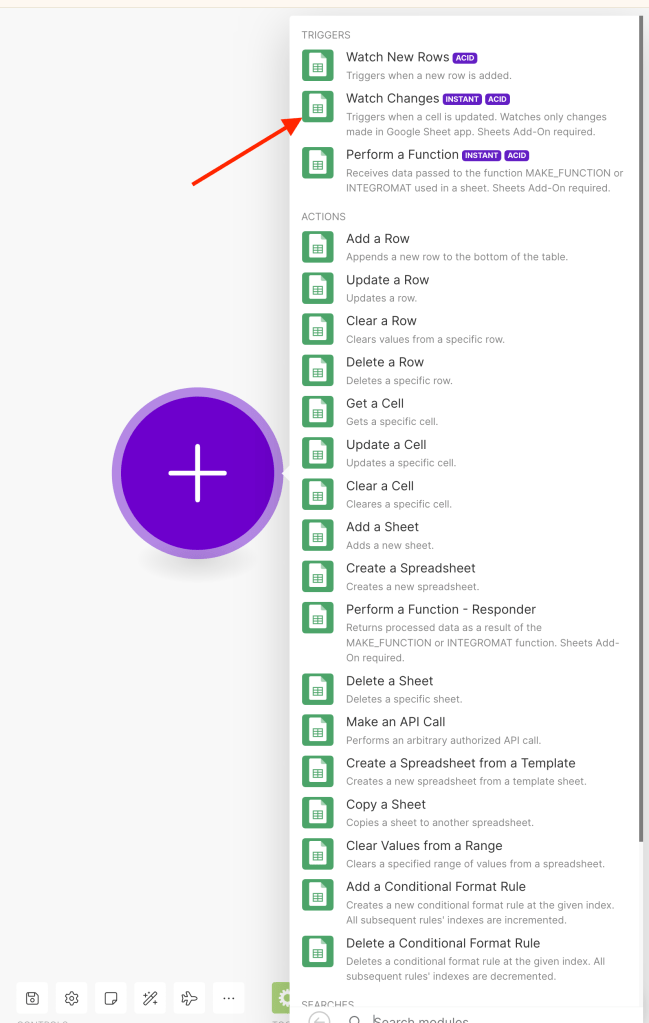
To begin, click on “install” and navigate to “Make” to create a new scenario. In the Make menu, choose the “Watch Changes” module from the “Triggers” section. This module is located within the Google Sheets category.
Next, click on “Create a webhook”.

Choose a name and save it. Afterward, you will see a URL generated by Make. Copy and paste this URL into your Google Sheet extension. Once copied, return to the spreadsheet and navigate to Extensions → Make for Google Sheets → Settings.

Then, a new window will open on the right. Paste the URL that was copied from Make into the first input box and click Save.

And that’s basically it. Our spreadsheet is ready, and now we’ll move forward to our Make scenario.
Create Audience Lists on Facebook Ads.
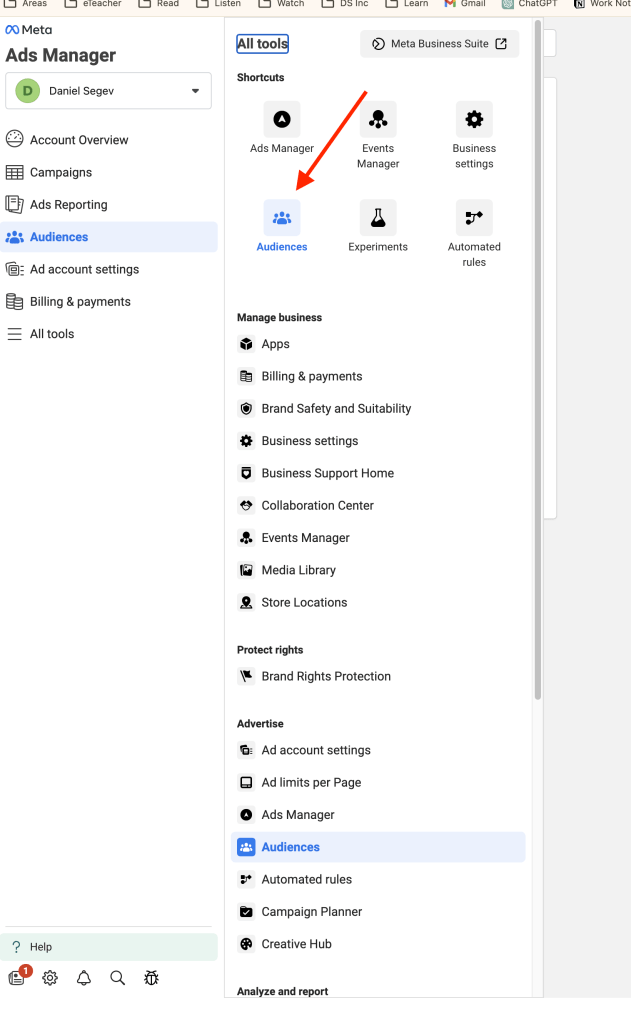
To access the Audiences feature in Meta’s business suite, navigate to the Audiences section.
Click on “Create a custom audience”.

And select “Customer list”.

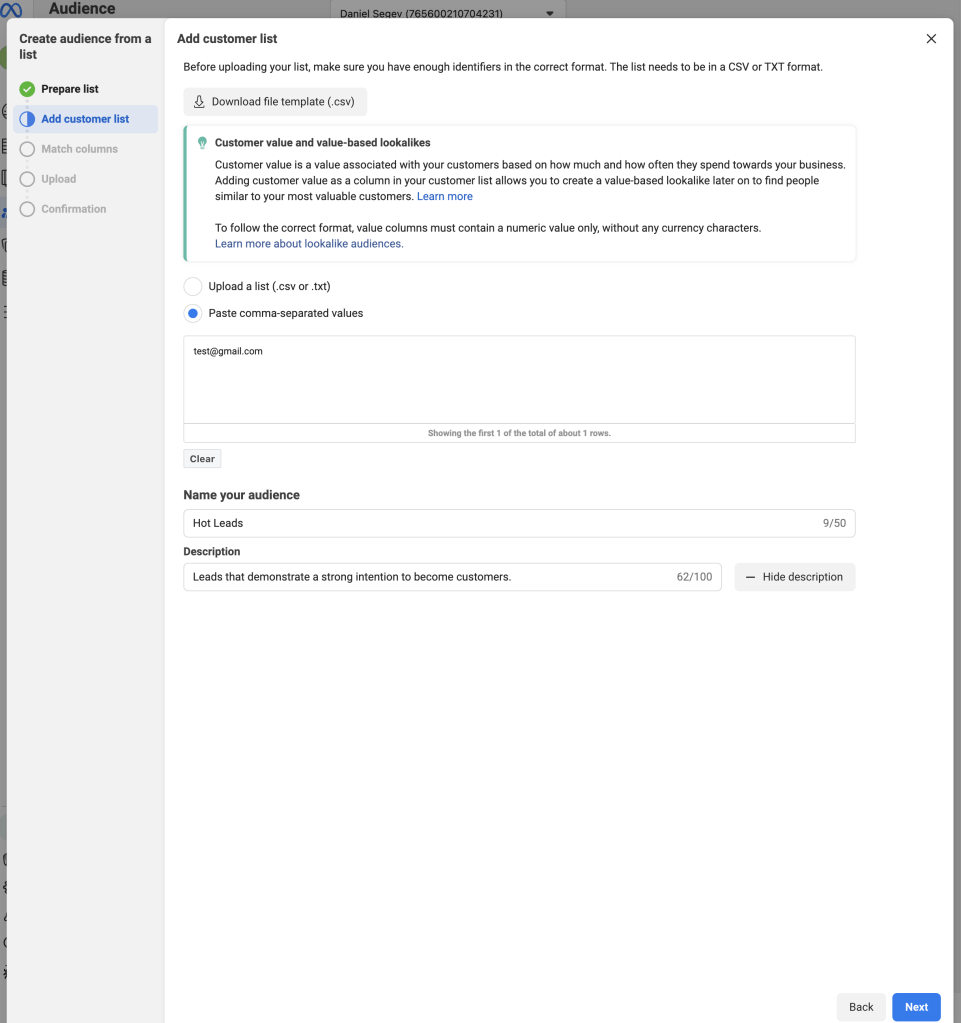
Click Next twice, and then choose the option of “Paste comma-separated values”. Paste a dummy email address just to proceed with this procedure. Choose a name for the list, and click “Next”.
Finally, click “Import & create” to complete the process and create the list.

- New Leads
- Cold Leads
- Customers
- Irrelevant
Next, we will do the same for the remaining planned lists, which are:
It is important to segment the irrelevant users as well. This is not only important for matching the right message to the right user, but also for allowing Facebook Ads to learn the ideal persona for our business. Therefore, it will be very helpful to identify which personas are not matching it. In the end, the audience screen should resemble the following:

Build the scenario using Make.
The trigger for the scenario (“Google Sheets Watch Changes”) has already been defined. Now, we need to complete the remaining steps of the scenario. The logic is simple and involves two steps:
- Add the user to the relevant audience.
- Remove the user from the previous list.
It is important to note that ideally, we will use the same automation to add new leads to both our spreadsheet and the “New Leads” audience list on Facebook Ads. However, this process is separate from lead generation. In this example, we will focus solely on the segmentation process.
To begin, we want to filter changes made specifically to the “Status” field within the spreadsheet. We can accomplish this by adding a condition between the first and second modules. To determine which fields we need to work with, we will make a change in the spreadsheet and then run our scenario to see the resulting data. I have already made a change to the status of one of the leads, and here is the data I obtained:

The things that interest us the most are:
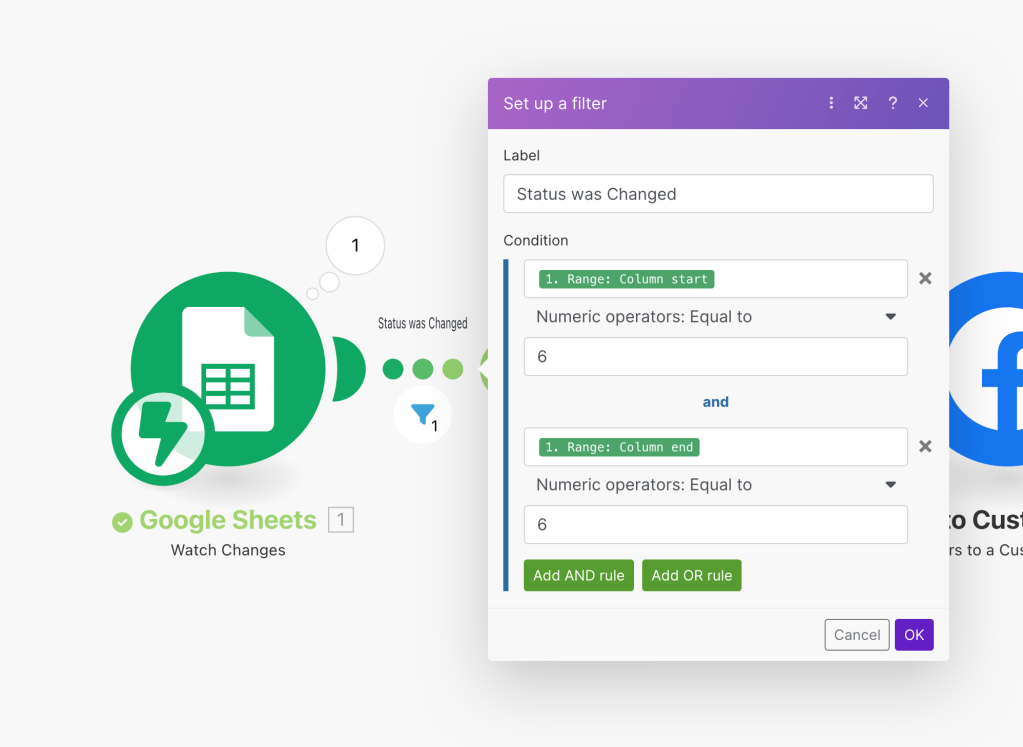
- Range: This is how we can determine if the “Status” field has changed. We know that it is located in column F, which means that the number 6 is what we are looking for.
- Old value: Previous status
- Value: New status
We will add a Facebook Custom Audience module for “Add User”.

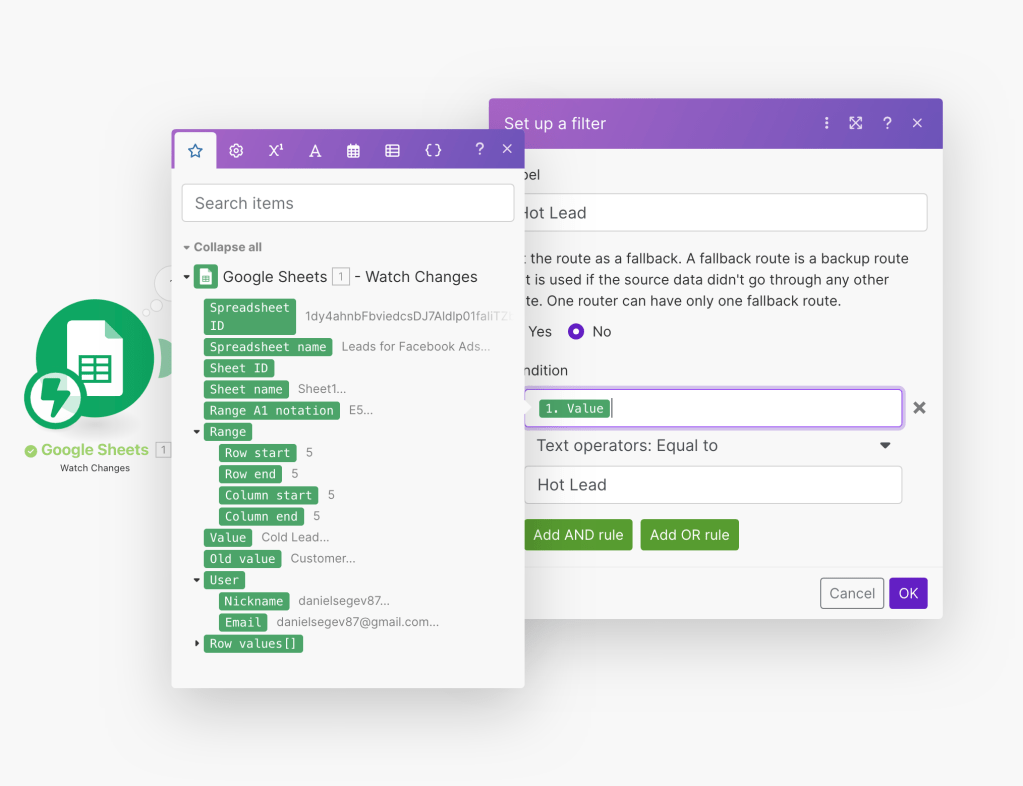
Between our modules, we will add a filter to execute only status changes. The filter should appear as follows:
Next, we will add a router between the modules. Each route will be applied to a different status and, consequently, a different audience list. We will focus on the first router, which applies to users who have become “Hot Leads”.

To include only cases with a “Hot Lead” value, we will add an additional filter between the router and the Facebook Ads module.
In the Facebook Ads module, the first step is to establish a connection to Meta. If you haven’t done so already, add a new connection. This will redirect you to Meta where you can follow the instructions to complete the integration in less than a minute.
Next, you’ll need to define the module by selecting the business manager account, ad account, and the audience list that needs to be updated.

Next, we need to add the details of the leads so that Facebook can match them to the list. Click on the plus symbol under “Data” and add all the available data from the spreadsheet. It should be mapped by the column’s ID, so in our case, it should look like this:

Continue mapping the relevant fields. In our example, we have four fields that can be updated: email, phone, first name, and last name. To match the fields from the Google Sheet, select the corresponding field in the Facebook Ads module. For instance, the email field corresponds to column A, where we stored the users’ emails. Sending more data to Facebook increases the chances of successfully matching the user and adding them to the list.
Next, we want to remove the user from the previous list they were assigned to. For example, if they were in the “New Leads” list, we want to remove them from it to prevent them from receiving the messaging intended for new leads. To do this, add another router and follow a similar process to what we have already done.
First, select the “Remove Audience Member” module.

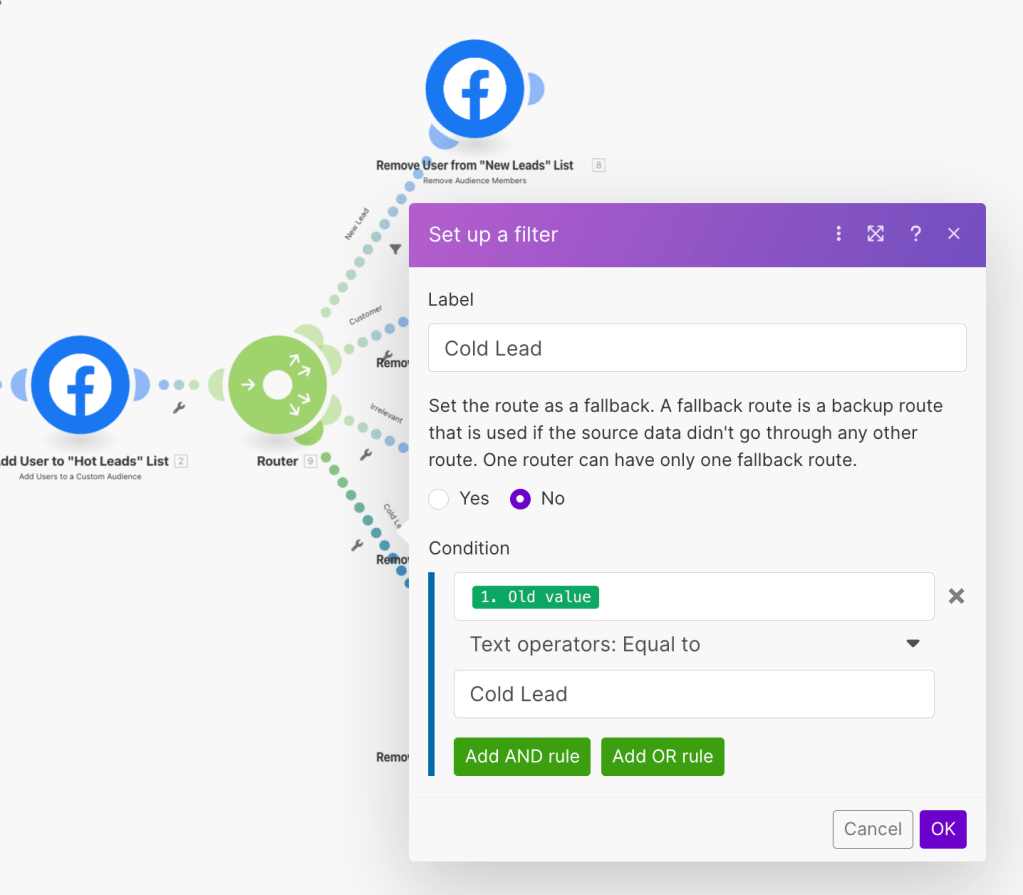
We will place it after the first Facebook Ads module that we added. In between them, we will add a router and create conditions based on the “Old value” field provided by the trigger. This is how it should look:

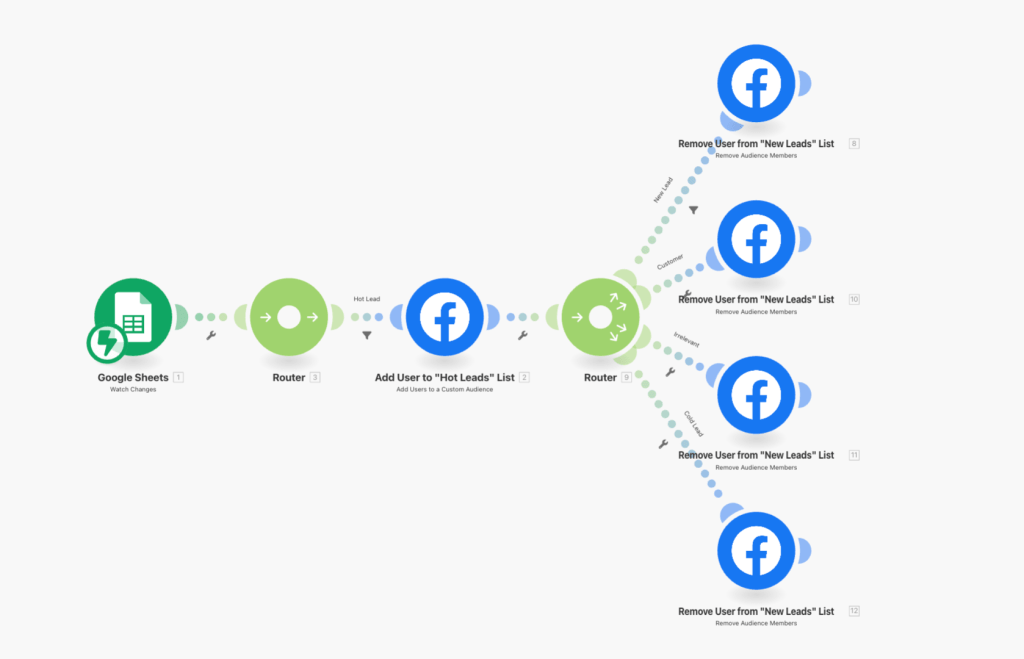
And this is what the entire scenario looks like now:

In the “Remove User” module, we will need to select the accounts and add the user’s data, similar to what we did in the previous module.
Next, we simply need to duplicate the same modules and adjust the filters to match the other lists, ensuring that we cover all possible scenarios in our automation. For each user addition, we will need to create four different modules for each list to be removed. For each route, we will use the appropriate condition based on the status. If we continue working on what we have, it will look like this:
To gain a better understanding, let’s take a look at how the filter within the route that leads to “Cold Leads” is defined.
Now, we simply need to duplicate the current structure we have and cover all statuses for user additions to the lists.

In essence, I cloned the same modules but modified the conditions and functionality to accommodate various scenarios of changing statuses. This is determined by the values set in the “Value” and “Old Value” fields configured in the Google Sheet. As these values are pre-defined, we can easily create conditions and configure the modules accordingly.
Test and activate
And that’s it, the scenario is ready to run. Now, you can offer significant discounts to these “Hot Leads” since they have shown intent to become your customers. Alternatively, you can use a content strategy to generate more interest in your brand among cold leads. Each user has their own timeline for making a purchasing decision or signing up for a service. It is important to stay consistent, have a clear plan and messaging, and let it all work in the background. This is the power of marketing automation.
You can offer significant discounts to these “Hot Leads” since they have shown intent to become your customers. Additionally, you can use a content strategy to generate more interest in your brand among cold leads. Each user has their own timeline for making a purchasing decision or signing up for a service. It is important to stay consistent, have a clear plan and messaging, and let it all work in the background. This is the power of marketing automation.
Recap
Marketing automation plays a crucial role in delivering targeted messages to the right audience at the right time. By segmenting your audience lists and updating them in real time, you can create personalized ad experiences and maximize the effectiveness of your campaigns. With the help of tools like Make, implementing marketing automation doesn’t require a large enterprise budget. Whether you’re a small business or a marketer, you can leverage automation to streamline your marketing operations and achieve better results. If you want to learn more about how marketing automation can benefit your business, feel free to contact me.
Thank you for reading and happy automating!


Leave a comment