Nowadays, you no longer need to have knowledge of Python, Linux commands, or SQL, nor do you need to be a data engineer or developer, to develop an ETL or ELT process. You don’t even need to know how to create a cloud environment or find an experienced developer. All you need is to choose the right tools and have a creative mindset.
In 2024, with a limited budget and no prior programming knowledge, you can achieve your ambition of creating sophisticated ETL processes without writing any code! Before we dive in, let’s explore the term ETL for those who aren’t familiar with this methodology. ETL stands for Extract, Transform, and Load. It refers to any process that extracts data from a source, transforms it, and loads it into a destination. An ETL process can be simple, like extracting weather data from the internet and loading it into a spreadsheet. It can also be complex, for example, extracting data from multiple sources like an online store and a physical store, and loading it into the same data warehouse.
In my previous guide, I explained how to extract data from a random source and load it into a Google Sheet using Make. This time, we will cover something more complex: extracting, transforming, and loading a larger amount of data into a database instead of a spreadsheet.
To begin, you will need an account with one of the following services:
- An automation tool: we will use Make as an example.
- An ETL tool: we will use Stitch Data as an example.
- A data warehouse: we will use AWS Redshift as an example (please note that I won’t go over how to setup the Redshift database on AWS, as it requires a different post in the future).
Once you have all these tools, you can start development, even though it is a no-code development process.
As you may recall, we are developing an ETL process. I won’t go over the term again, but as a reminder, we need to first extract the data from the source, then transform it in any desired way, and finally load it into our destination. So let’s start from the beginning:
Step 1: Extract
Creating a PayPal Application via PayPal Developers Portal
To illustrate our example, we will use the PayPal API to extract data and integrate it into our Make scenario. To begin, you will need a PayPal developer account to create an app. You can complete these steps here.
If your goal is to only retrieve reports from the system, select the “Transaction search” option under “Other features” (as shown below) after creating and setting up the application:

By doing this, you will ensure that the application has the necessary permissions. Remember to securely store and retain a copy of the app’s keys for future use in Make. Now, let’s proceed to creating a new scenario in Make.
Make Scenario
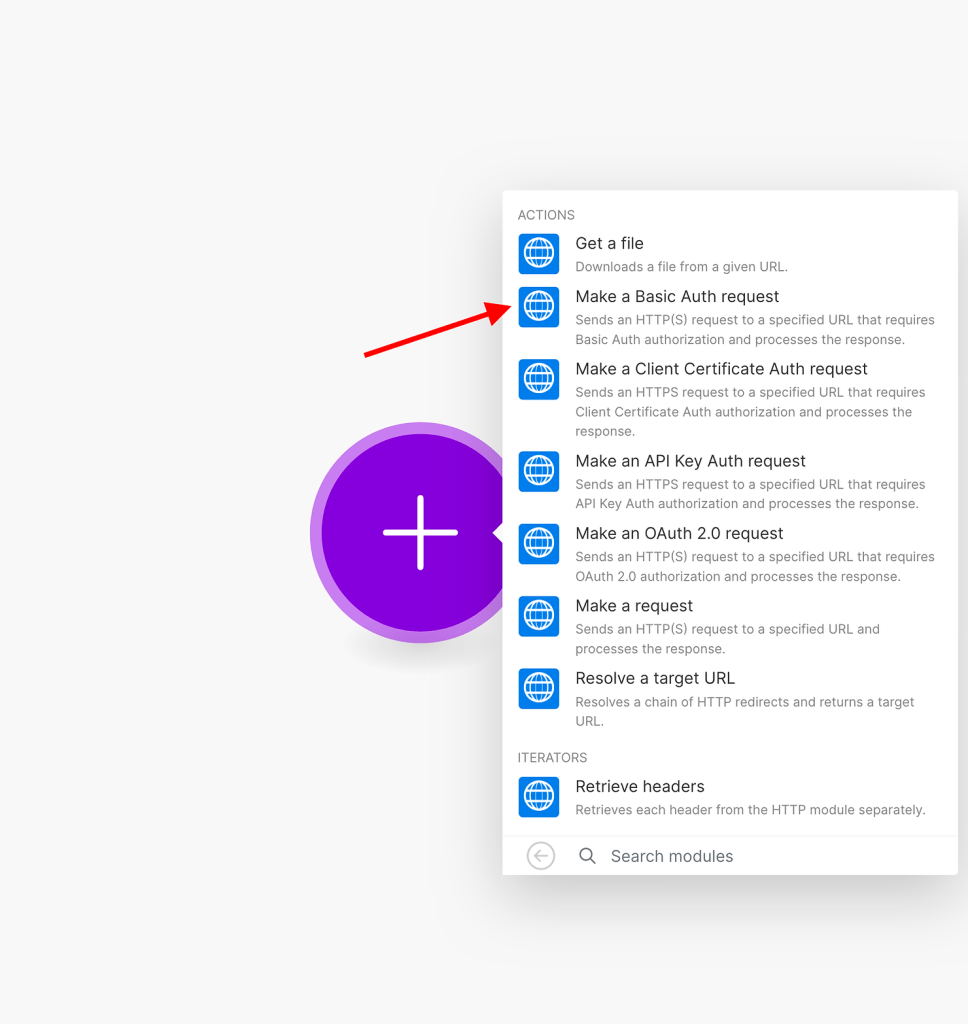
On Make’s side, we need to create a new scenario and first gain access to our PayPal data. To obtain access to PayPal’s report, we will use the OAuth request module. It is important that only relevant users have access to the data, as it is our account. This process helps ensure the correct handling of data. Therefore, we will choose the HTTP module to make a basic OAuth request.
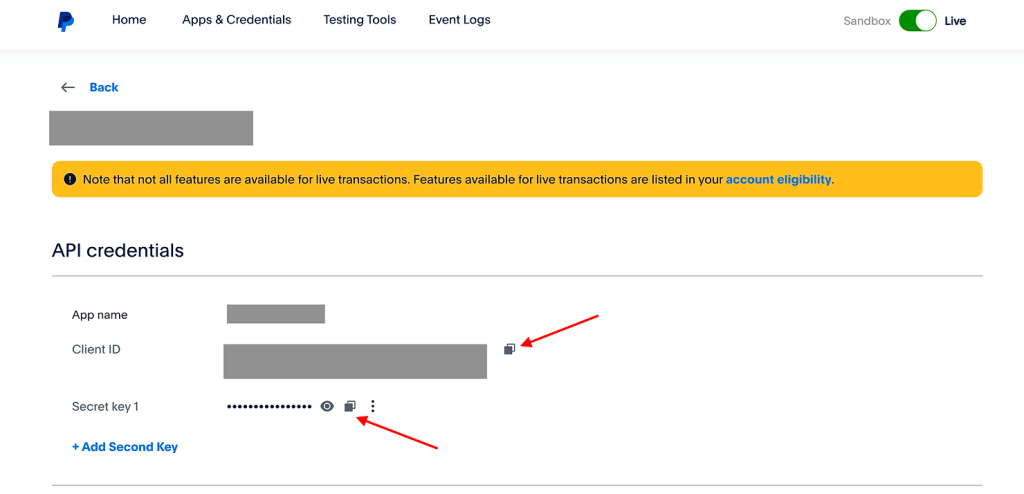
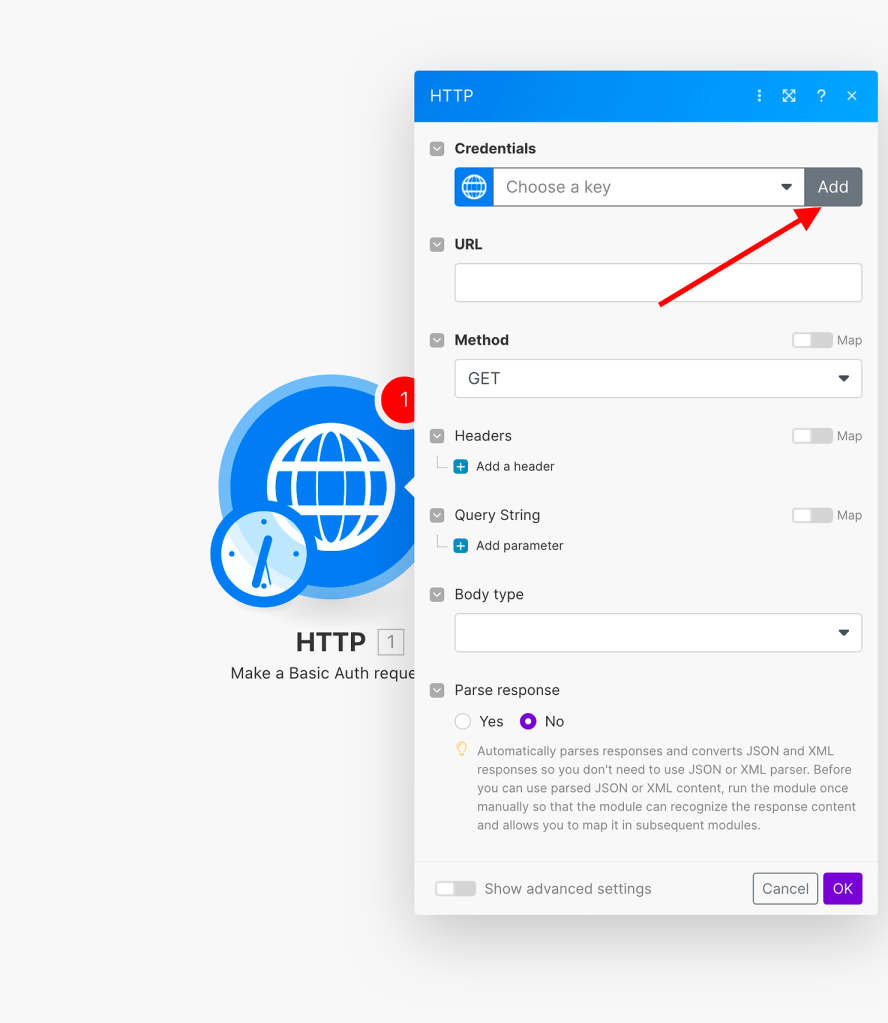
Now, we need to create new credentials based on the keys provided by PayPal. To do this, simply click on the “Add” button and then copy and paste your application’s client ID and secret. Both of these can be found in the application’s settings page, as shown below:
Once copied, go back to Make, and click on “Add New Credentials.”
Now a new window will open, and you’ll need to paste the values from PayPal’s application. For the ‘Username’, paste the ‘Client ID’, and for the password, use the ‘Secret Key 1’.
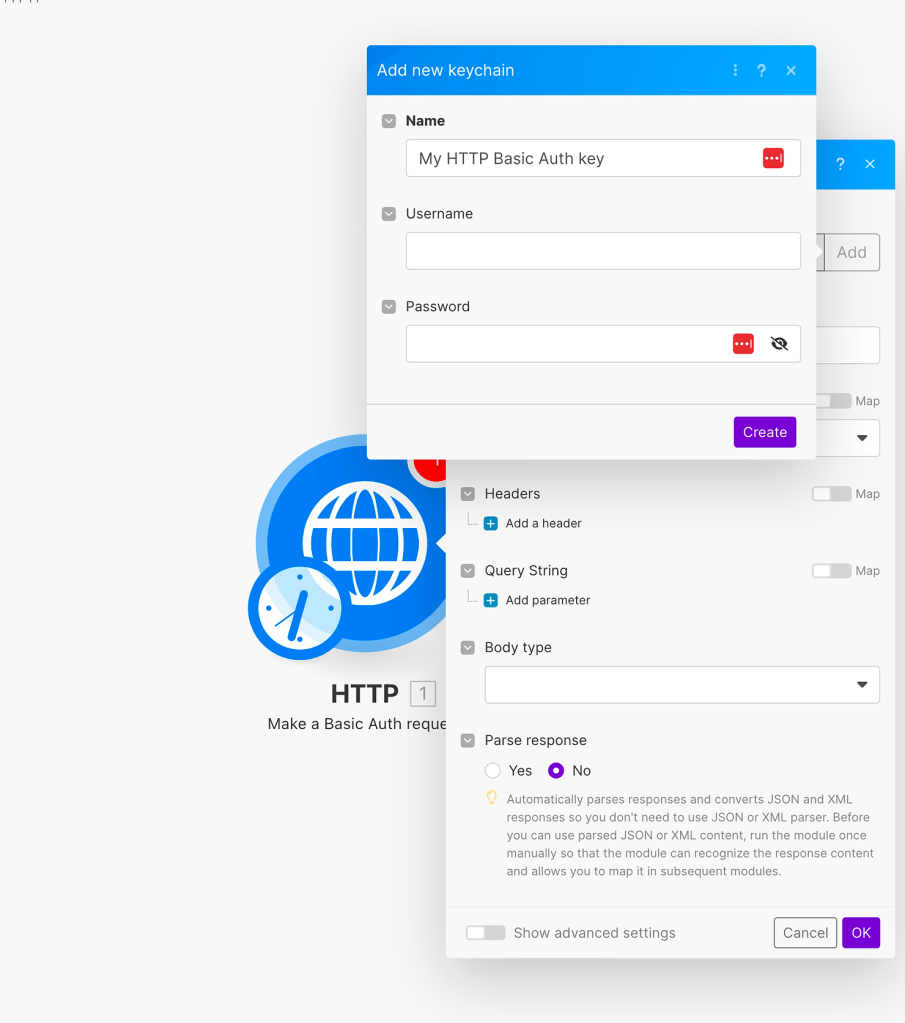
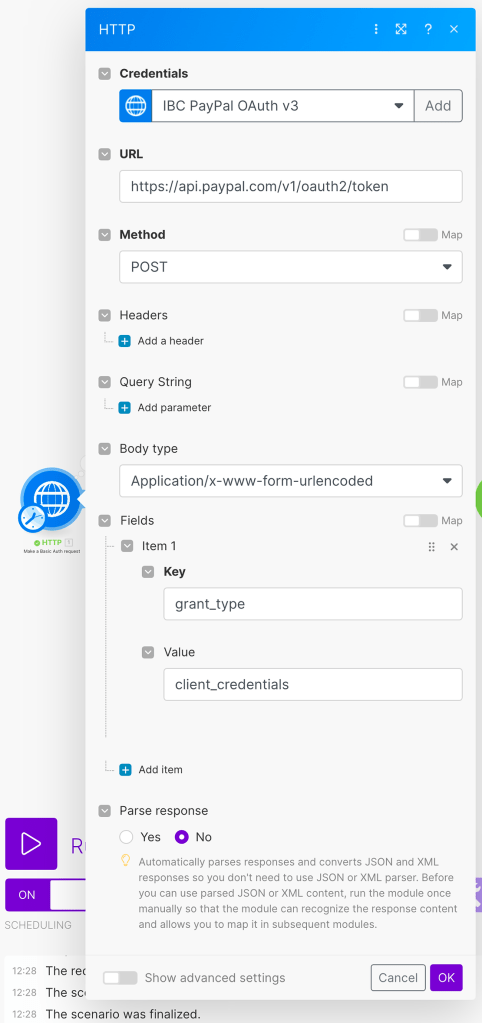
Give it an informative name and click “Create”. Now we’ll move on to define our HTTP Auth request, according to PayPal’s API guide. For the URL, place the following address:
https://api.paypal.com/v1/oauth2/tokenFor the method, we will use POST. And for the body type, we will use “Application/x-www-form-urlencoded”. Create a new field under “Fields” with the following:
Key: grant_type
Value: client_credentials
In the end, it should look like the following:
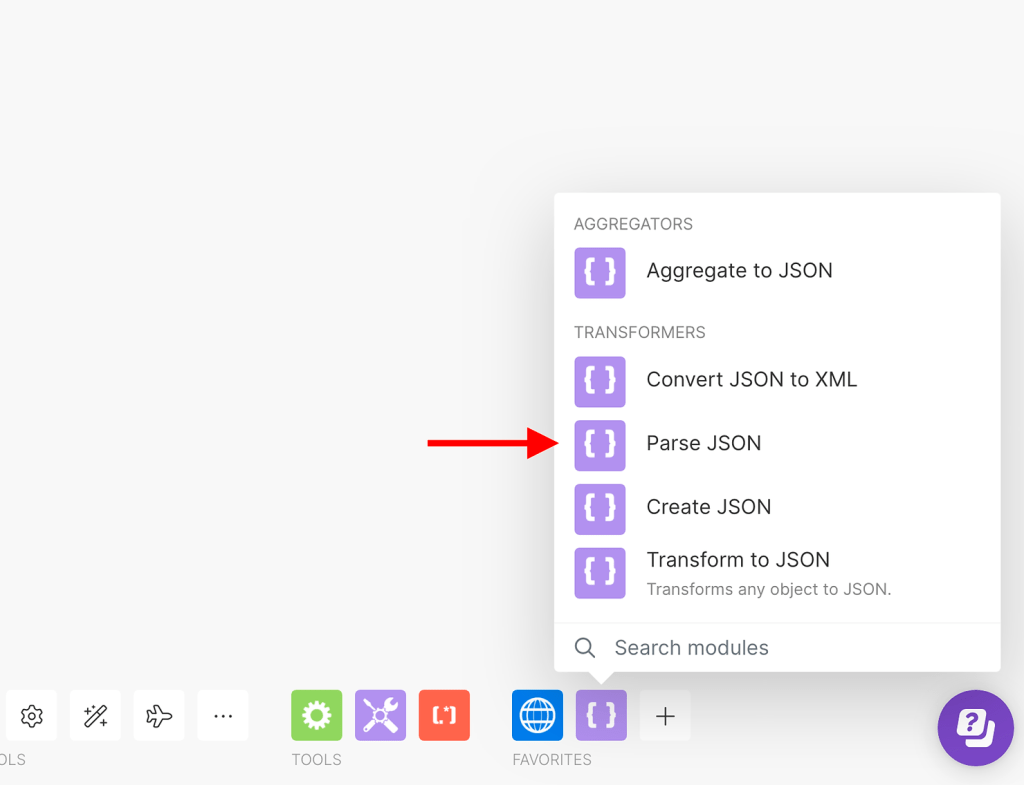
Once activated, you will be able to observe that this module retrieves data in JSON format. Somewhere within the text, it contains the token required to access the reports. Instead of searching for the token within the entire JSON payload, we can utilize another Make module called ‘Parse JSON’.
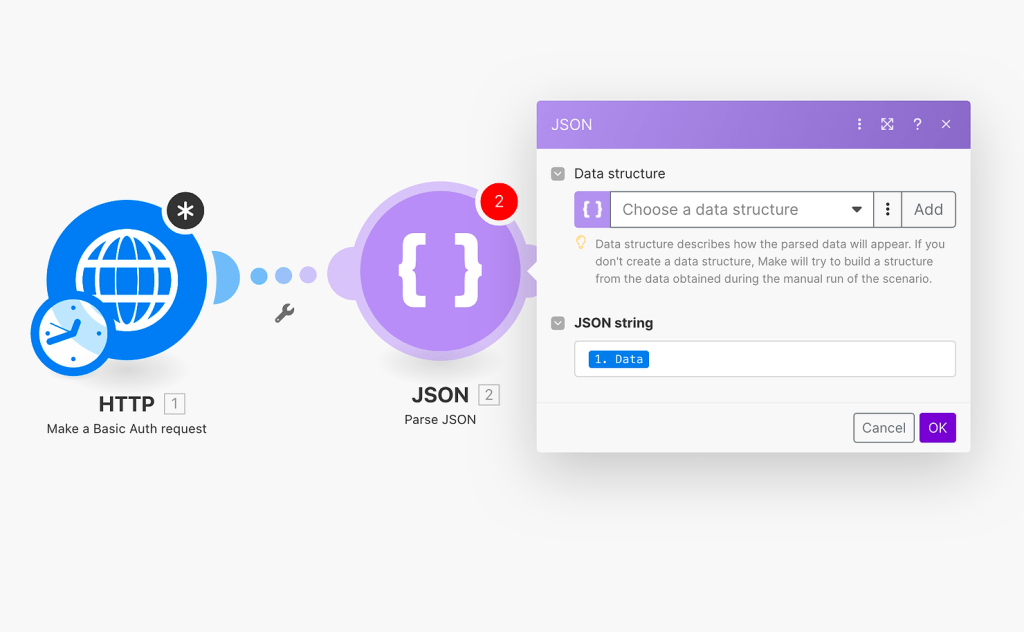
Within the module, we will need to place the data that is retrieved from the HTTP module, as shown below:
Next, we will add another HTTP module, specifically the “Make a request” module. Before configuring the third module, we will run it once to obtain a preview of the retrieved data. Assuming the scenario was set up correctly, the ‘Parse JSON’ module should have extracted the access token as a field. You can simply retrieve it from the payload in the HTTP response, as demonstrated below:

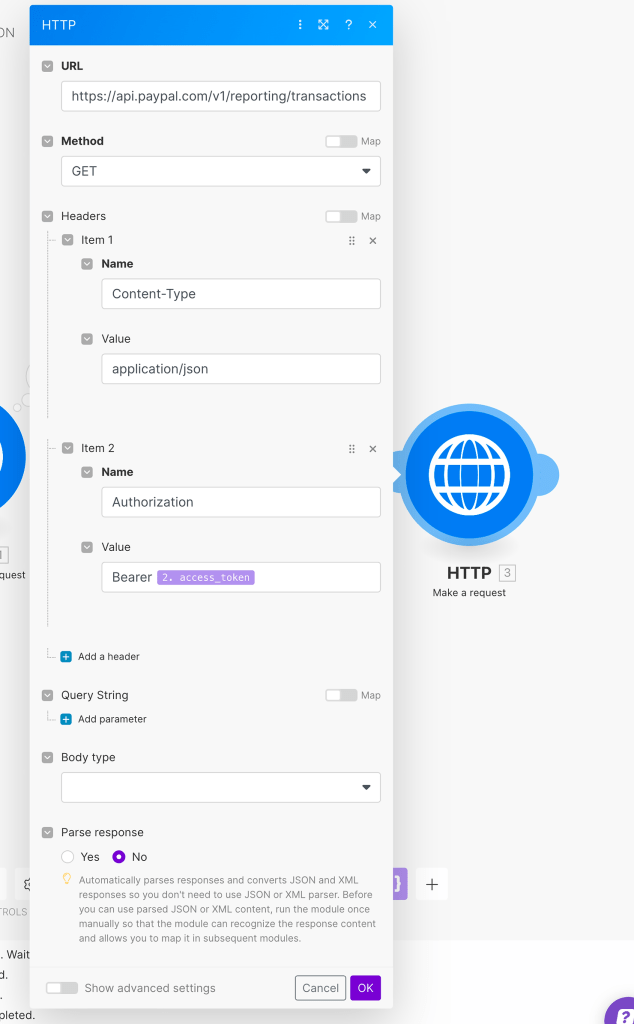
Now, let’s create the HTTP request to pull data from PayPal. To retrieve the transactions report, which contains all the financial movements in the account, use the following URL: https://api.paypal.com/v1/reporting/transactions. Set the method as “GET”.
Next, add the access token to the request’s header. Include an item called “Authorization” with the value “Bearer {{your_access_token_field}}”. The completed request should look like this:
Now we can proceed to configure the report itself. PayPal provides various segments that can be adjusted when sending a request. These segments include the maximum number of results, start date, transaction information, and more. For more details, please refer to PayPal’s API documentation.
In our example, we will use the following fields: page size, start date, end date, transaction information, and balance-affecting records. This approach ensures that only transactions resulting in a monetary gain or loss will be included in the report. Therefore, the final configuration should resemble the following:

As you can see, I have configured the start date to yesterday (using a formula that generates yesterday’s date at 12:00 AM). This is because I always want to retrieve all the data for yesterday and today. Specifically, I want to retrieve all the transaction information that has affected my balance.
Please note that if this is the first time you are generating data for the table, you will need to include more historical data than just yesterday. So, make sure you retrieve all the necessary historical data first before using the ongoing module.
Now, the scenario is ready to retrieve some real data from PayPal. Run it once and observe the results. However, please note that I will only show a glimpse of the results as I do not want to expose sensitive information from my PayPal account:
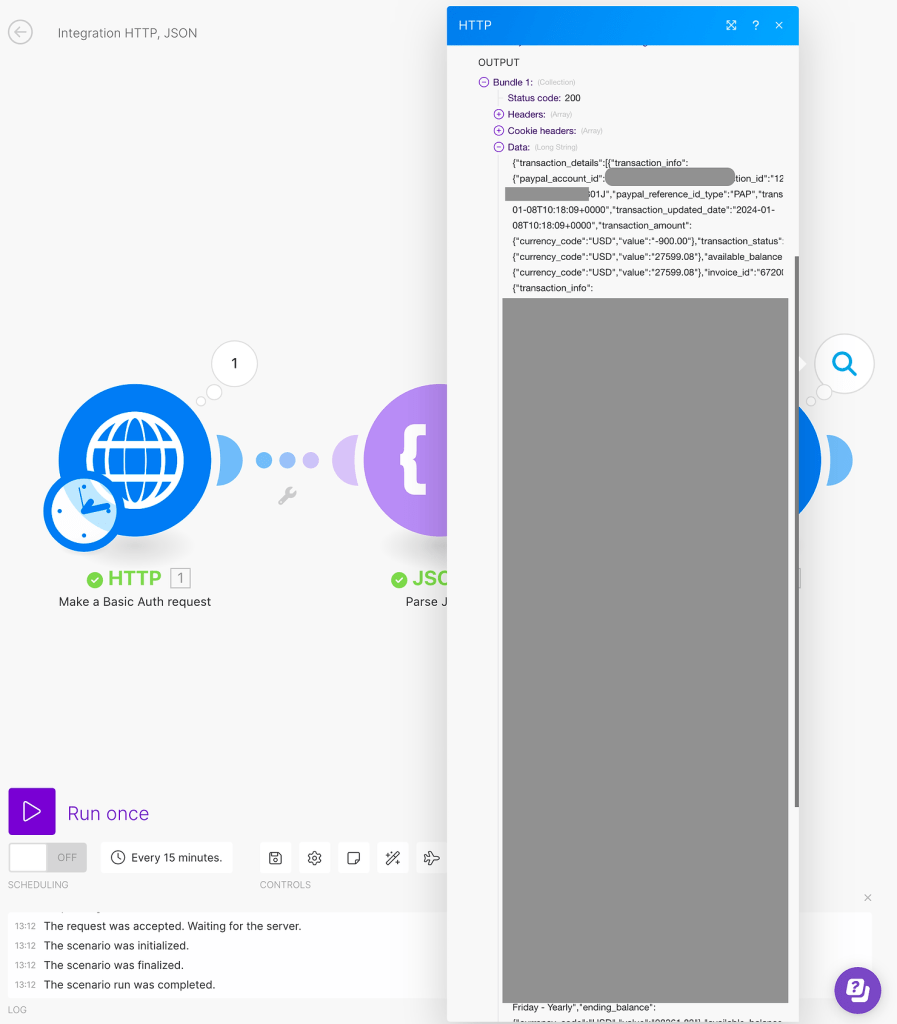
As you can see, the data was retrieved in a messy format. Similar to the first module, we received a JSON payload containing all the data, which needs to be organized. To accomplish this, we will utilize the “Parse JSON” module once again, but this time for the second HTTP module.
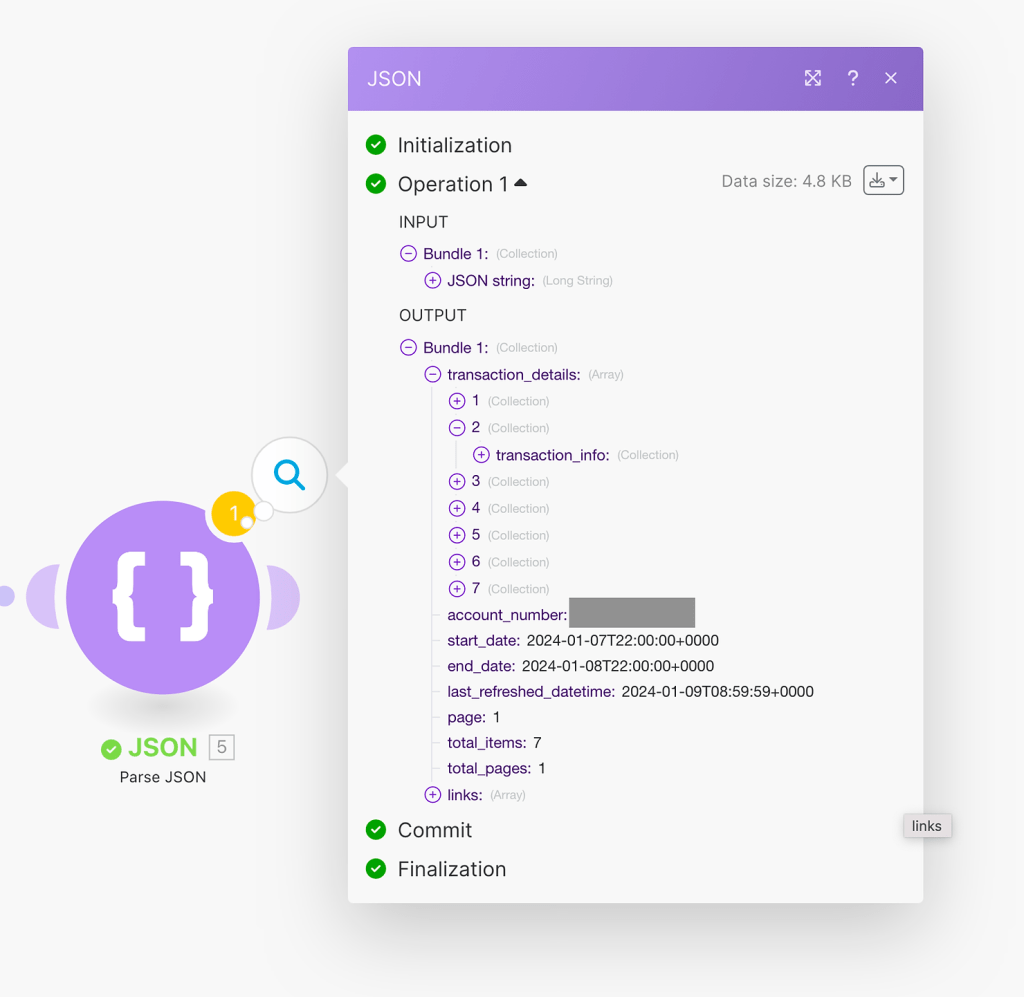
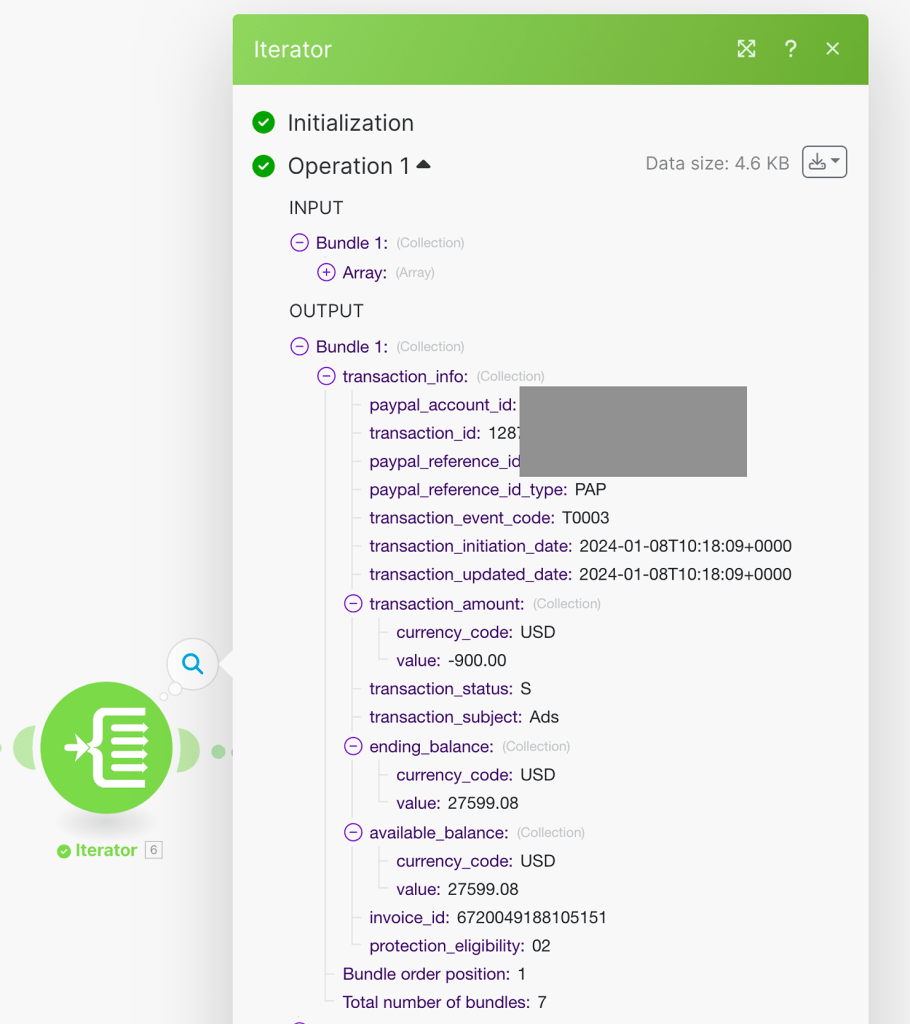
We have received a payload that contains an array with 7 collections. Each collection represents a transaction in the account, which is the essential data we need. The other data in the payload is not useful unless you want to monitor the extraction job itself. To obtain the actual data of the transactions in an organized and clean manner, we just need to add another step of “Iterator”, as shown below:
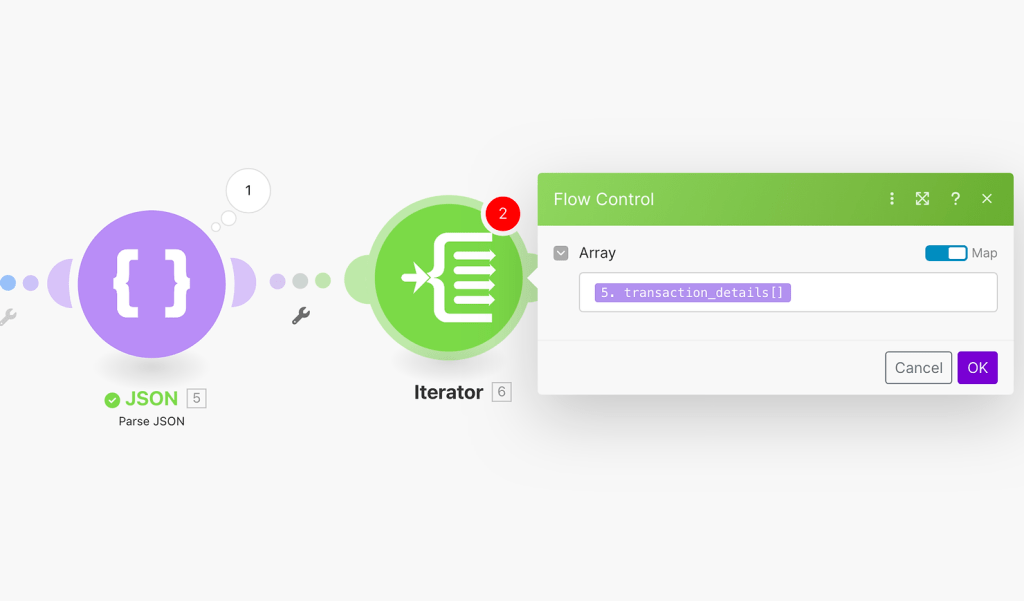
After using the Iterator, the transaction data becomes manageable and easy to map. In our scenario, the final step involves making another HTTP request, but this time, it will be used to send the data to our ETL tool – Stitch Data. Now, it’s time to proceed to the second step in our project.
Step 2: Transformation and Load
Sending Data to Stitch and Loading it to DWH
To continue with our “No-Code” approach for the ETL (Extract, Transform, Load) tool, we will be using Stitch Data from Talend, which is known for its reliability. Talend is a leading provider of ETL tools globally, offering a tool that is easy to integrate and develop processes with. Furthermore, Talend has launched another product that requires no technical knowledge and offers a wide range of integrations, seamlessly connecting with popular data warehouses such as SQL Server, PostgreSQL, AWS Redshift, and more.
Before launching, the only requirement is to allow access to this tool on both the source and destination sides. Once the connections are established, you simply choose the data you want to replicate to your data warehouse, adjust the syncing time, and let it run in the background. Stitch’s pricing is based on the number of rows replicated, and after carefully comparing similar tools, I believe it provides the best value for money.
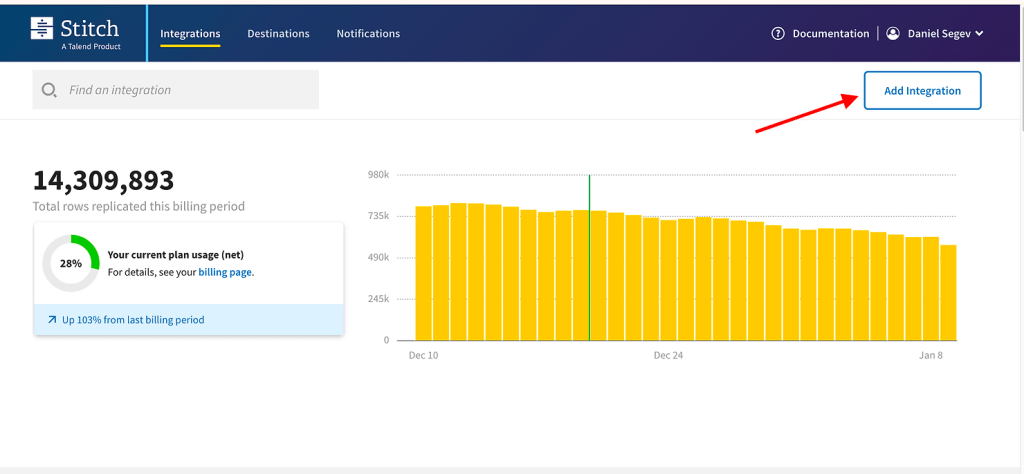
After setting up the account, you need to select an integration from the catalog.
While Stitch offers a wide range of integrations, you may notice that there is no integration available for PayPal. However, you can still proceed by using one of the two custom integrations offered by Stitch: “Webhooks” or “Import API”. In our case, the simplest solution would be the webhook integration, as it does not require any data validation before sending it to Stitch. We assume that every PayPal transaction will have the same structure and does not need further modification.
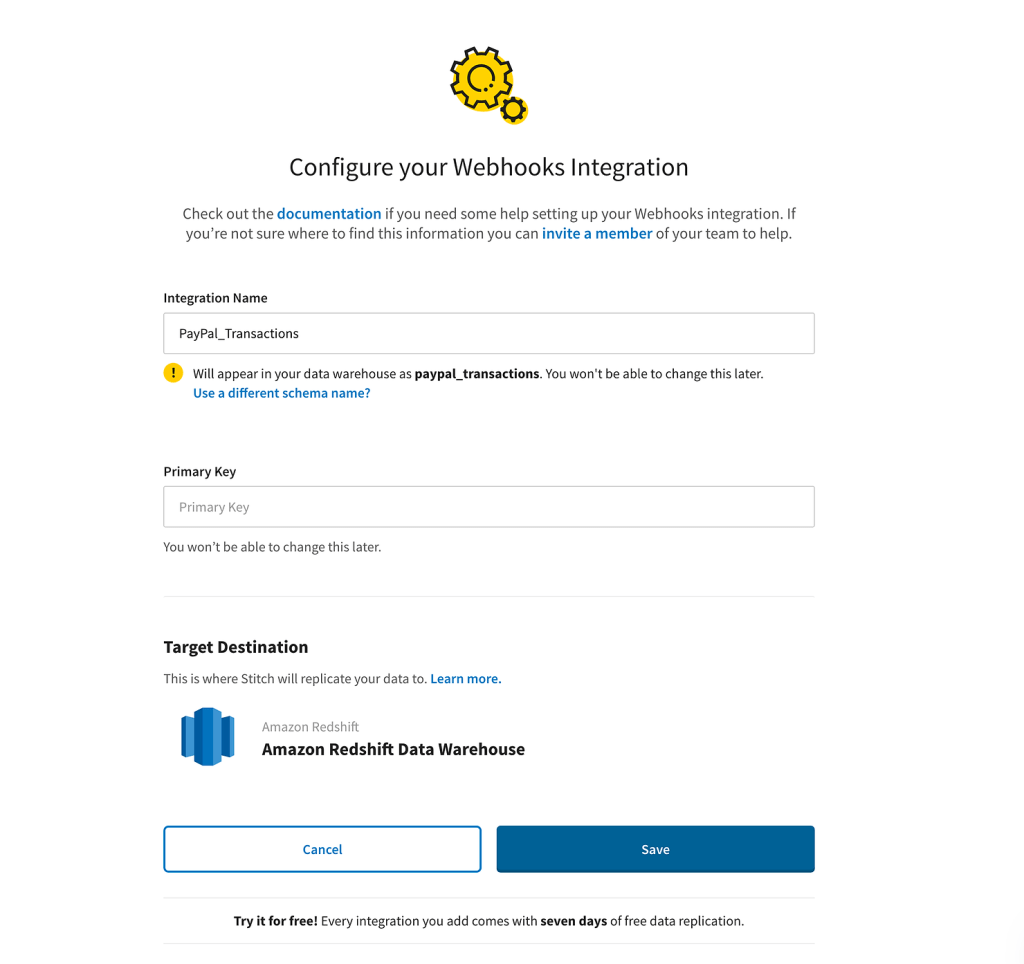
To proceed, select the “Webhooks” integration, provide a name for it, choose a destination (such as Amazon Redshift), and click “Save”.
Once created, you will see a URL provided for the webhook integration. This URL needs to be added on Make’s side in the final module of the scenario. We will now return to Make and input the URL there. Choose the POST method and add the fields as they were mapped by the “Parse JSON” module earlier.

Now, we need to determine the structure of the final table. We will review the data available for each transaction and decide if it is necessary to include it. For my table, I have tried to include as many fields as possible, like:
- Account ID
- Transaction ID
- Reference ID
- Reference ID Type
- Event code
- Initiation date
- Updated date
- Transaction amount
- Fee amount
- Transaction status
- Transaction subject
- Protection eligibility
All of these fields are provided by PayPal, as clearly shown:
To complete the process, you only need to map the desired fields in the HTTP request, as shown below:
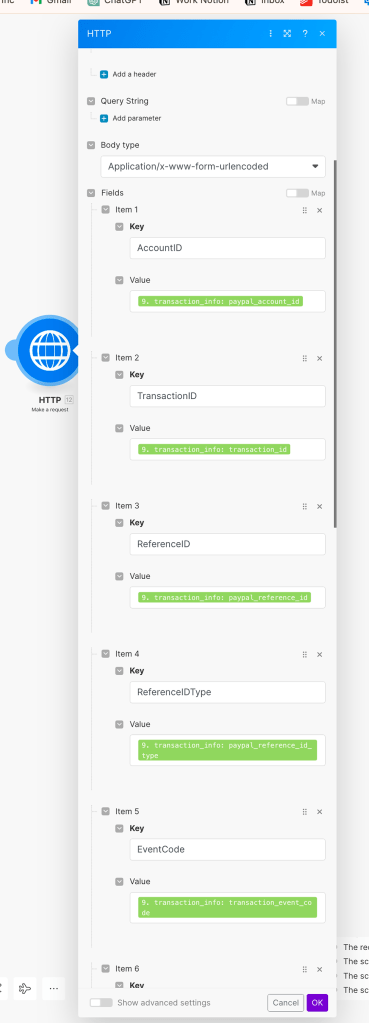
Make sure to include all fields you want in the destination. If you’re not sure about certain fields, it’s better to include them anyway and not use them eventually. It’s better to include unnecessary fields than to exclude some and later discover that you actually needed them. It’s highly recommended to maintain a consistent structure in all webhooks sent to Stitch Data. Therefore, ensure you finalize the structure of the data before you start sending it.
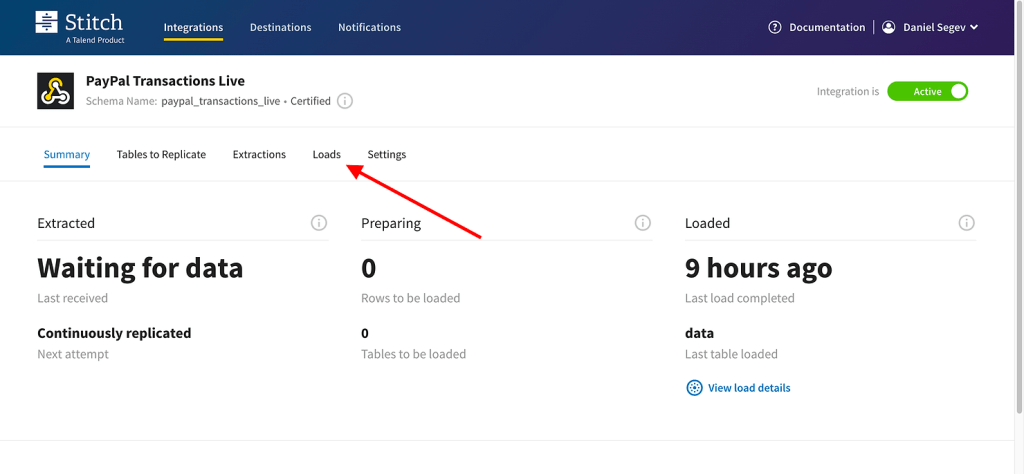
And that’s basically it! Once the scenario starts sending data to Stitch, you’ll be able to monitor it in the “Loads” tab on the integration page.
Step 3: Visualize and Get Value from the Data
Now that you have all the necessary data, which is automated and structured in your warehouse, the next step is to extract insights, useful information, and values from it. If you are familiar with working with PayPal, you are likely aware of the complexity involved in calculating balances. There are different types of transactions, some representing income, some representing expenses, and some put on hold for dispute handling. To help you better understand the data, please refer to PayPal’s transaction event codes to identify which code corresponds to each action.
Stitch also includes an updated time field for each generated row, allowing you to filter out duplicate values of the same transaction ID. Depending on the visualization tool you use, you can simply use a rank function to identify the most recently updated row.
Of course, additional adjustments and transformations may be necessary. For example, in my BI tool, I have to convert the date value, which is received as text. So, make sure you fully prepare the data for analysis, and eventually, you will be able to create a report identical to what you see on PayPal.
Conclusion
That’s it! You don’t need to write code, configure complex infrastructure, or incur major costs. With minimal effort and just 45-60 minutes, you can develop impressive ETL/ELT processes. Get creative with the options provided in the tools, and there will be no limit to what you can achieve.
The no-code approach to ETL/ELT processes offers a simple and efficient way to handle data extraction, transformation, and loading tasks. By using the right tools and being creative with the available options, even users without coding expertise can accomplish advanced ETL development.
Throughout the process, we have demonstrated how to extract data from PayPal using Make, transform and load the data using Stitch Data, and visualize and derive value from the data in the DWH. With minimal effort and within a short timeframe, you can develop powerful ETL processes that meet your specific needs. By exploring the various possibilities offered by the tools and leveraging your own knowledge, you can unlock the full potential of your data and gain valuable insights.
Have questions or need some insights into your no-code journey? Whether it’s about overcoming a specific challenge, seeking feedback, or exploring more about no-code data integration, I’m here to help! Reach out to me for personalized advice and insights. Your journey in data management doesn’t have to be a solo adventure. Let’s connect, share experiences, and drive towards success together. Don’t hesitate to contact me for any queries, feedback, or just a chat about all things no-code. Drop me a message, and let’s start a conversation that could transform your data processes!


Leave a comment