One of the best things about Notion is its ability to combine back-end, front-end, and automations, functioning like a high-quality mobile app. Instead of using separate task management, habit tracking, and journaling apps, you can have all of them in one place – your Notion workspace.
For those unfamiliar with Notion, it is an all-in-one workspace app that simplifies information and task management. It replaces the need for multiple apps by providing a comprehensive solution for organizing notes, tasks, projects, and databases.
To demonstrate the capabilities of Notion’s powerful tools, let me provide an example of how I track my daily habits. On my Notion homepage, I have created visually appealing buttons that trigger a complete automation process. This process involves adding records to various databases, checking checkboxes, visualizing data, and more. The greatest advantage is that you have complete control over the entire process in one centralized location, with limitless possibilities.
The idea is to automate everything on a single page, making habit logging and tracking easy, while ensuring visibility of all activities. Fortunately, Notion enables you to accomplish all of this. Here is a quick glimpse of how my “Habits Hub” looks:
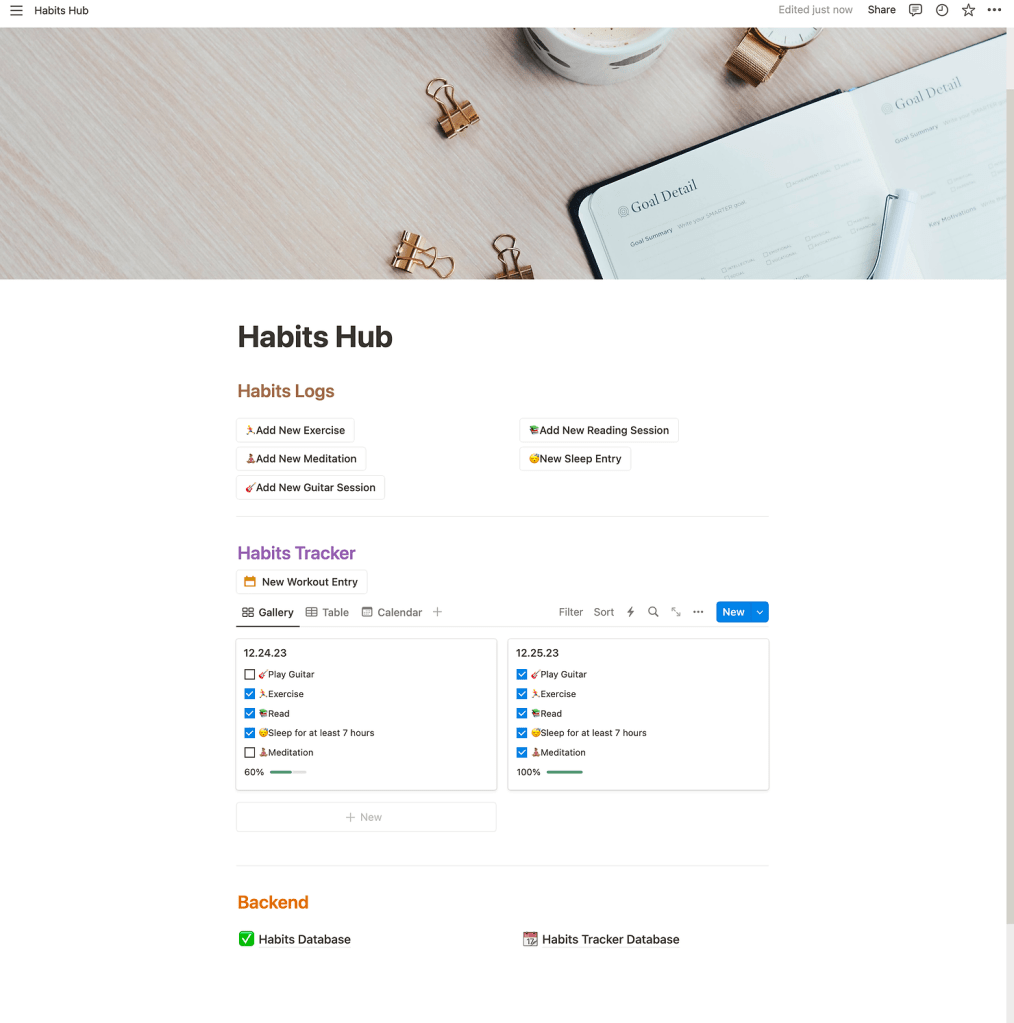
As you can see, the first section contains buttons that allow you to create new entries for habits. These buttons perform two actions behind the scenes, which we will cover later on. The second section displays the habit tracker, showing which habits I performed today and the completion rate. Lastly, there are links to the “backend”, which are the databases that contain all the data. Without further ado, let’s dive into my improved habits tracker and let me spark your imagination.
The “Backend”
The Habits Database
The term “Backend” refers to the data and logic that operate behind the scenes, typically unseen by end users. In our case, the backend will consist of databases that store habits and the tracker. To develop this backend, we need databases that will contain all the project data.
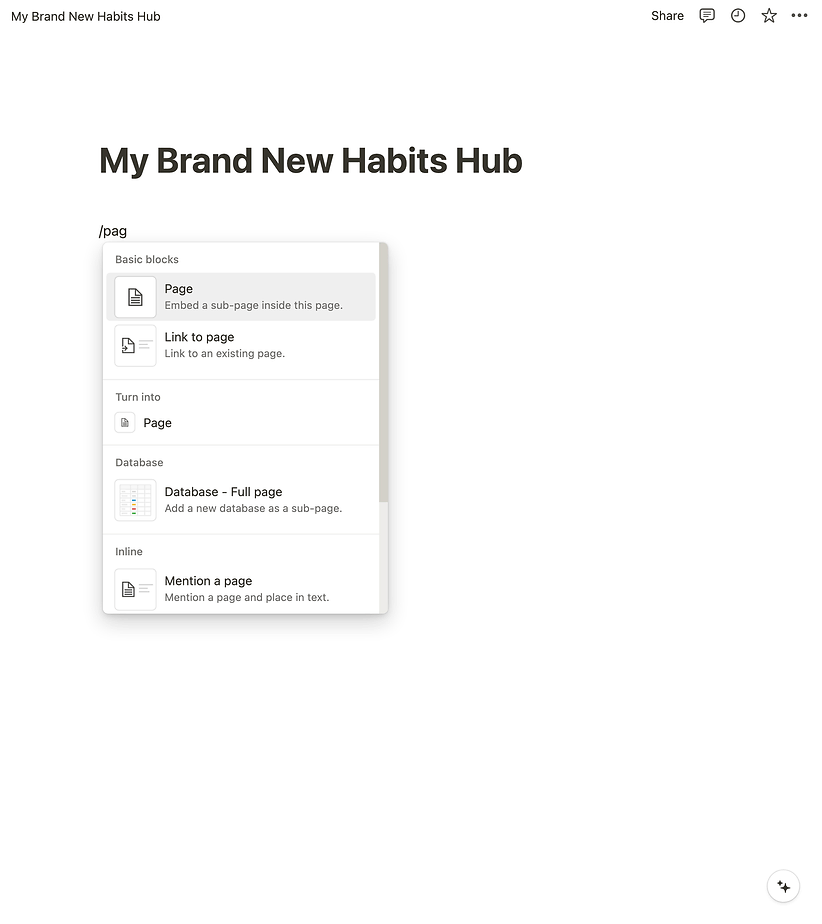
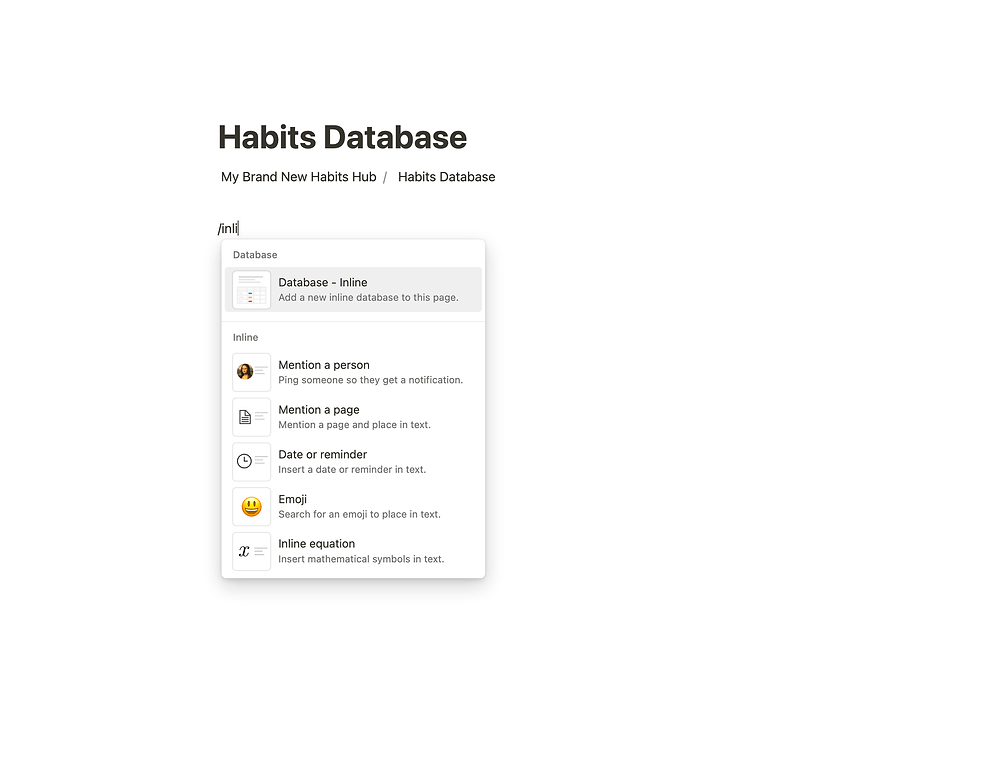
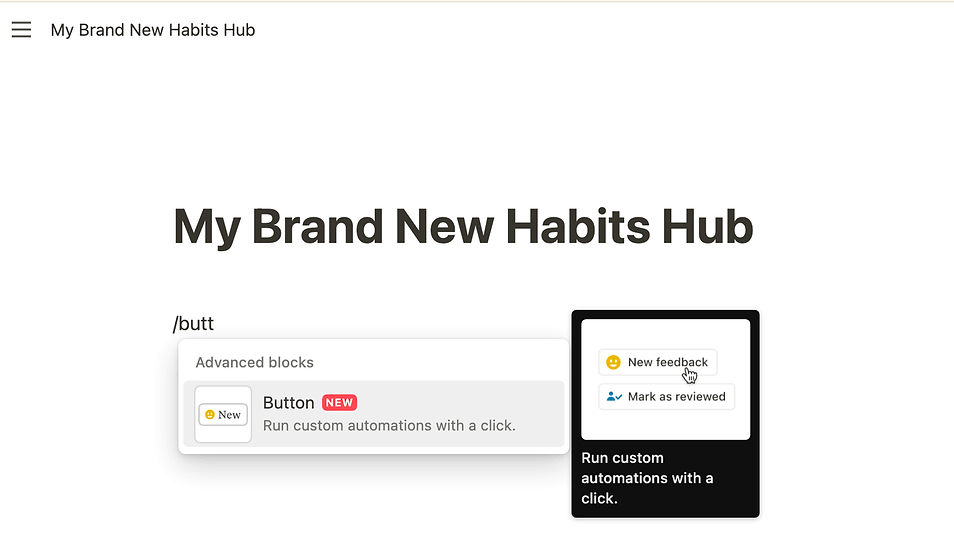
To begin, we will create the habits database. This can be done by generating a new page within the hub and creating an inline database within it. Notion provides various blocks, such as pages, databases, and more. You can generate these blocks by typing the ‘/’ character and selecting the desired block from the menu, as demonstrated below.

Now, let’s configure the properties of the habits database. A property is similar to a column in a table and represents different attributes related to a specific row. In our example, each row represents a habit, and each habit has various attributes. I have added these properties as an example, but feel free to adjust them according to your preferences:
- Area: This is a single select field that indicates whether the habit relates to your job, family, health, or any other important area in your life.
- Description: This is a short text field where you can describe the purpose of the habit and how to perform it.
- Status: This is an active/inactive field that indicates whether a habit is currently being pursued.
- Time created: This field allows you to keep track of when you first started each habit, providing insights into your journey.
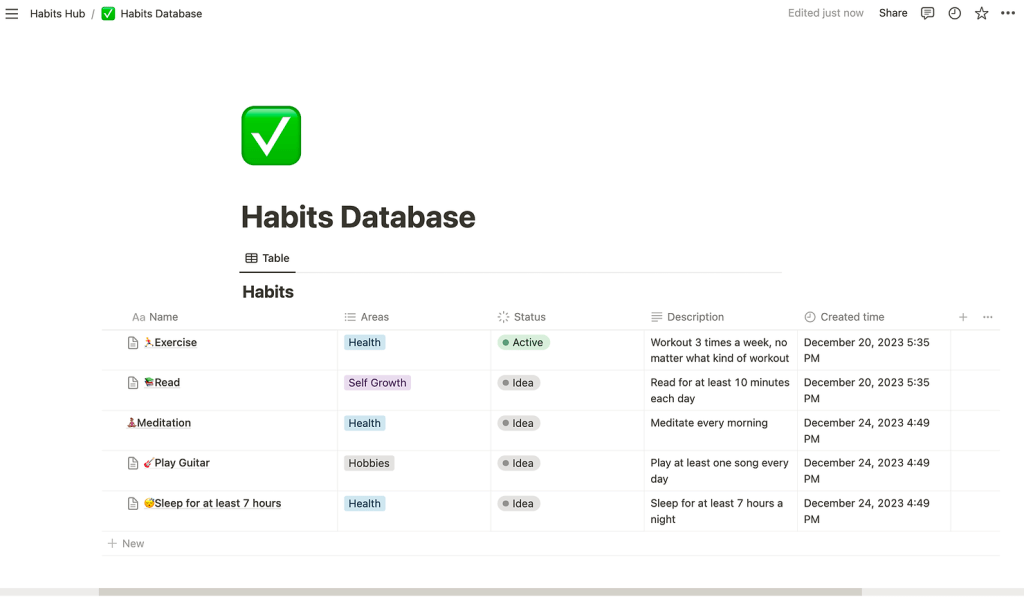
The final layout of the database should resemble the following:

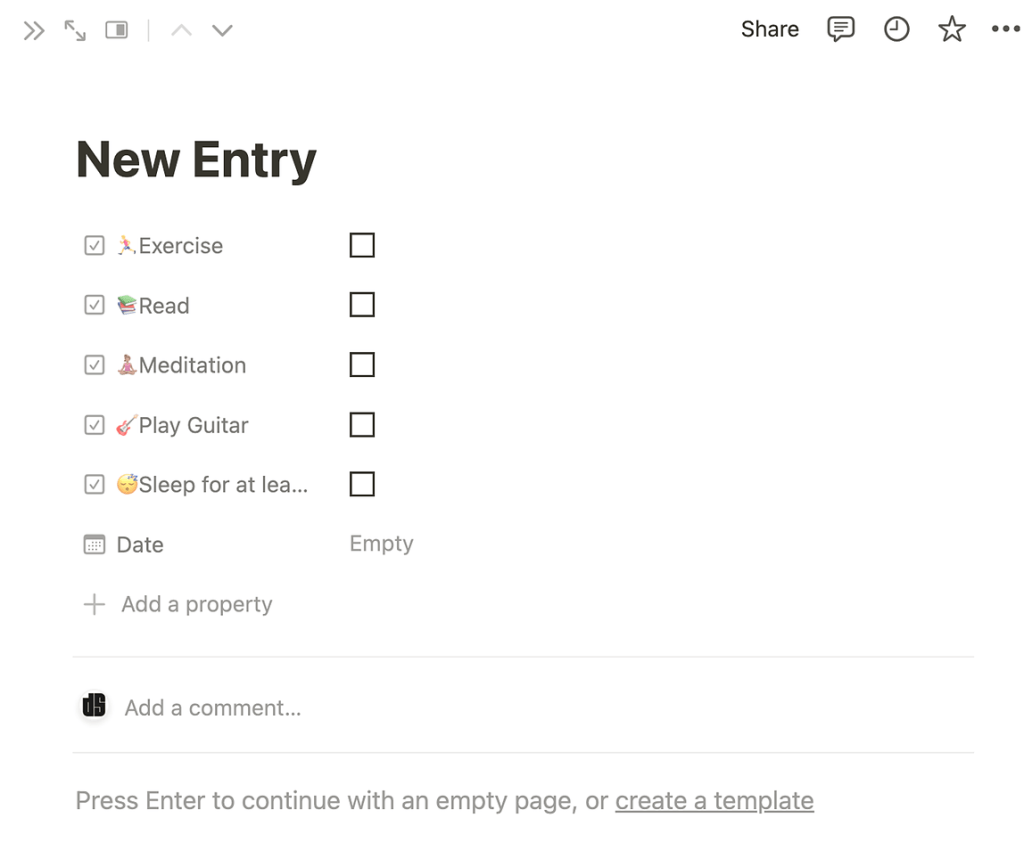
When we open a specific page/item in the database, we will see the properties listed below. You have the option to edit, add, or remove properties in the page view as well.

Now let’s proceed to adding the habits themselves. Here are a few examples, but feel free to add the habits that resonate with you:
- Exercise
- Read
- Meditate
- Play the guitar
- Sleep for at least 7 hours
Within each habit, create an inline database to represent the habit’s log. Each entry in the log will contain specific data related to that habit. For example, let’s configure the log for the exercise habit:
- Time created
- Date (the date of the workout, which can be adjusted if the entry is added on a different day)
- Location (gym, home, or outdoors)
- Type (strength training, cardio, yoga, or any other relevant category)
Repeat this process for the remaining habits, creating an inline database for each one. Now let’s take a look at the log for the “Exercise” habit and see what it should eventually look like.

You can see some examples I added just to get an idea of the final outcome. Eventually, you will gather a lot of useful data that can serve you in many different ways in the future. It will also help you keep track of the actions that you value the most in your life.
The “Habits Tracker”
After completing the habits area, the next step is to create the “Tracker”. This tracker will be located on a separate page and will have its own database, completing our backend assets. To create the tracker, go back to the hub and create a new page titled “Habits Tracker”. Once again, click on the “/” character, choose “New Page”, and then select “Inline database”. For the properties of the database, we will use the habits’ completion by choosing a checkbox for each one. Copy the exact same titles as they appear in the habits database. Additionally, include a date field.
To calculate the completion rate for each day, add a formula property. Inside the formula tab, use the following script:
( if( prop( "🎸Play Guitar"),1,0) + if(prop("🏃♂️Exercise"),1,0) + if(prop("📚Read"),1,0) + if(prop("😴Sleep for at least 7 hours"),1,0) + if(prop("🧘🏽♀️Meditation"),1,0)) / 5In Notion, the formula will appear as follows:

This formula checks if each habit has been marked and adds ‘1’ to the calculation for each completed habit. After checking all the habits, the result is divided by the total number of habits, which is 5 in this case. The completion rate is then displayed. To improve visualization, adjust the property to display the result as a percentage and add a progress bar.

The “Front End”
Creating Buttons and Automations
Now that the tracker is in place, we can proceed to finish the design of the “Habits Hub” page. Let’s follow the example provided at the beginning in terms of layout and outline. Start by creating the first section, which will include buttons that trigger automated actions in the created databases. To do this, create a button and specify its automation (again, simply click on “/”, but this time select “Button”).
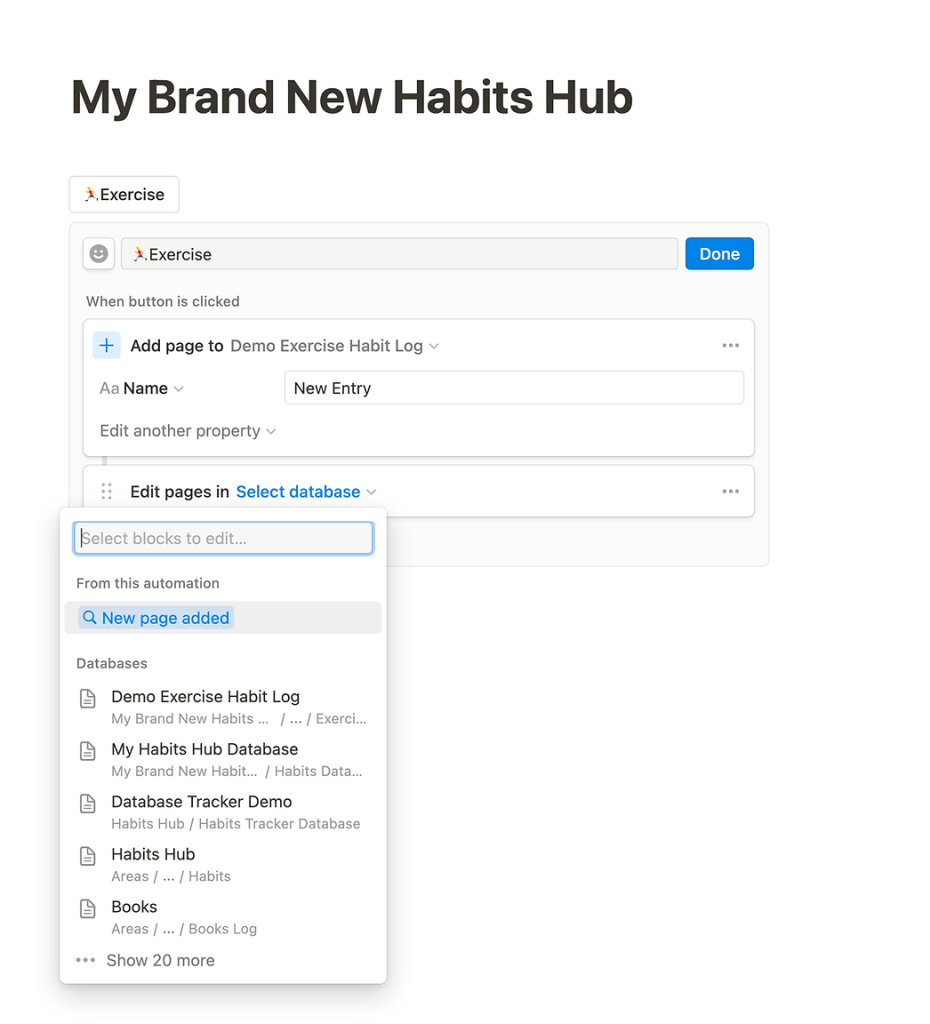
Each habit requires its own button. Let’s begin with the “Exercise” habit and name the button accordingly. Next, add an action for “Add page to…” and select the relevant database, which in this case is the “Demo Exercise Habit Log” created earlier. Name the action “New Entry.” To ensure the date is adjusted to today, choose the option “Edit pages in…”

When selecting the page, choose “New page added” to ensure that you are editing the correct page.
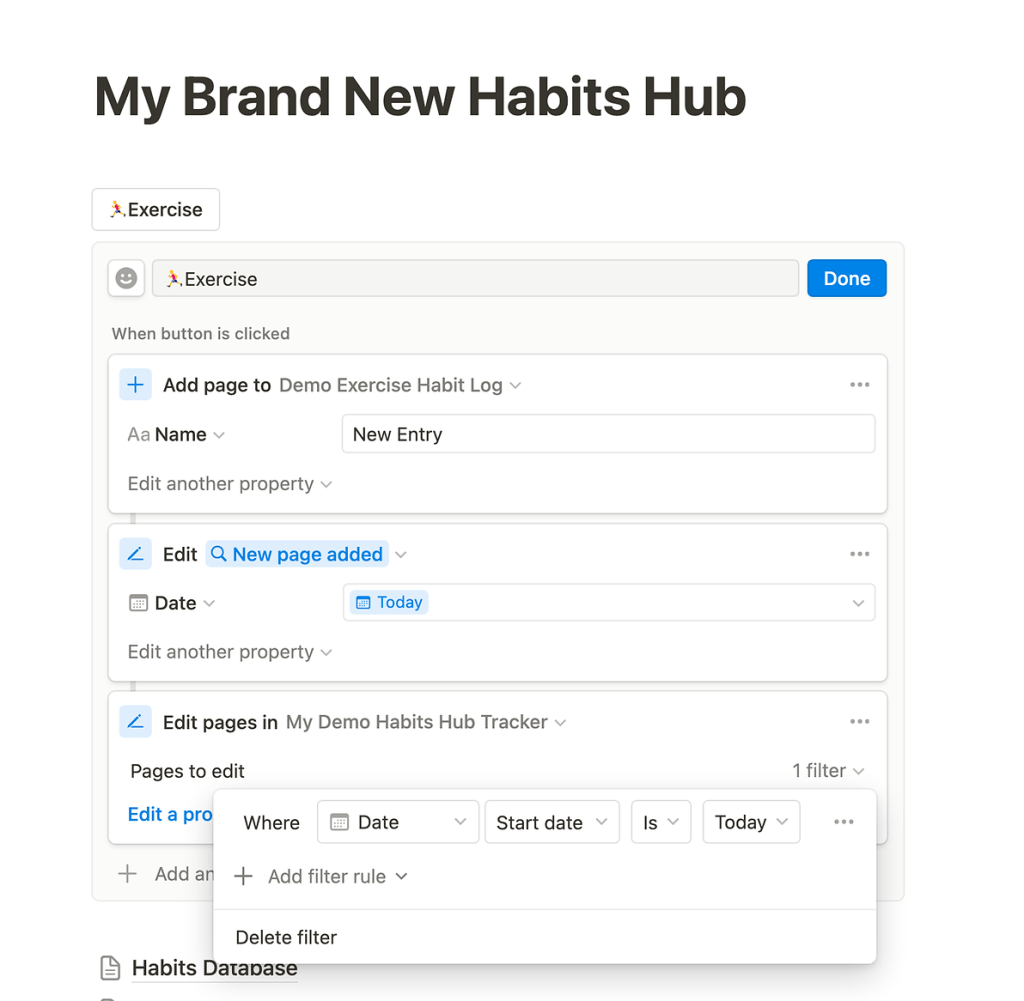
To modify properties in the page editor, select the ones you want to change and assign their corresponding values. For instance, update the “Date” field to today’s date.

The next step is to check the habit in the second database, called the “Habits Tracker.” Once again, use the action “Edit page in…” but this time, choose the tracker database. To edit only the relevant page, apply a filter for the “Date” field and specify today’s date.
Finally, open the newly created page in the “Exercise” database. This will allow you to define properties for each entry, such as “Location” and “Type.” You can easily set these properties by clicking the button. Repeat these steps for each habit, adjusting the actions based on their specific requirements. The possibilities are endless. For example, you can connect your reading habit with another database containing all the books you have read. By associating the relevant book with the habit, you can track exactly which book you read and when. The level of customization is completely up to you.
Show Tracker and Define View in the Habits Hub
Now that the tracker and buttons are in place, it’s time to finalize the “Habits Hub” page. Notion offers various view options for databases, such as gallery, calendar, and table. Personally, I prefer the gallery view with disabled card previews, displaying the relevant properties from each page. Additionally, I like to include view options for easy switching between different perspectives.
To achieve this, go to the main page and add a block of “Linked view of database”:

Next, select the database for the Habits Tracker that we created earlier, and define its view according to your preferences.

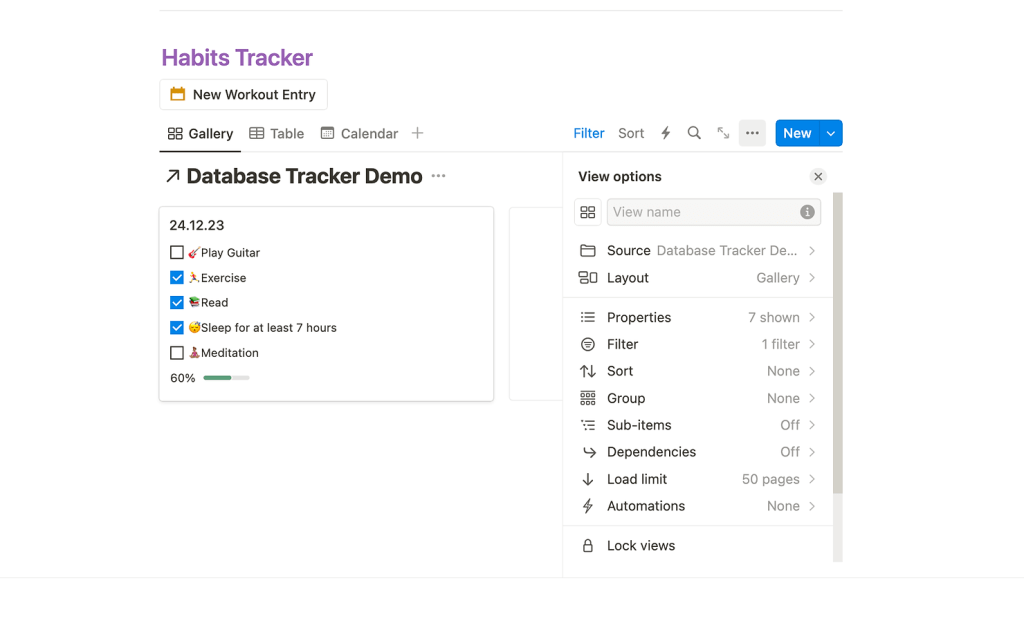
As shown above, I have the flexibility to switch between the gallery view, a table, or a calendar. In addition, I can choose to view only today’s record in advance, or remove the filter to review my performance in the past few days. This level of control allows me to assess how it impacts my mental state and happiness. I highly recommend this approach to anyone who places a high importance on their daily habits.
Recap
Notion’s beauty lies in its ability to leverage both backend and frontend functionalities, allowing you to create a custom app-like experience. The example I provided is just a glimpse of what you can achieve with Notion. You can take it further by creating new habits with automated buttons that add entries to relevant databases. Additionally, you can implement complex calculations to identify habits that require more attention based on recent performance. The creative possibilities are endless, and Notion provides the necessary tools to bring your ideas to life.
With a bit of imagination and exploration, you can transform Notion into a powerful platform for organizing your life and achieving your goals. Embrace the flexibility and unleash your creativity!
Need help with Notion or other no-code apps/services? Contact me today!
If you want to enhance your productivity and streamline your workflow using Notion or other no-code apps/services like Make, Airtable, or anything else, I’m here to help. Whether you need guidance, consulting, or have any questions, feel free to contact me.


Leave a comment